配置语言
- 编辑hexo配置文件
_config.yml - 配置属性:
language language属性需要依据当前主题的language文件夹中的文件命名设置,如当前版本中文语言为:zh-CN.yml,该属性就设置为:zh-CN。有的版本可能设置为:zh-Hans- 配置如:
language: zh-CN
字数统计、阅读时长
- 插件:hexo-symbols-count-time,地址:
https://github.com/theme-next/hexo-symbols-count-time - 在hexo根目录安装
npm install hexo-symbols-count-time --save
- 配置主题_config.yml文件
# Post wordcount display settings # Dependencies: https://github.com/theme-next/hexo-symbols-count-time symbols_count_time: separated_meta: true item_text_post: true item_text_total: true awl: 4 wpm: 275 - 属性说明:
配置流程图功能
- 博客安装好后,默认不支持Markdown流程图功能,需要使用流程图插件hexo-filter-flowchart:
https://github.com/bubkoo/hexo-filter-flowchart - 在hexo根目录安装
npm install --save hexo-filter-flowchart
- 配置hexo的_config.yml文件
- 增加属性:
flowchart: # raphael: # optional, the source url of raphael.js # flowchart: # optional, the source url of flowchart.js options: # options used for `drawSVG` - 说明:依官网介绍,配置的内容将被合并到
{ "raphael": "https://cdnjs.cloudflare.com/ajax/libs/raphael/2.2.7/raphael.min.js", "flowchart": "https://cdnjs.cloudflare.com/ajax/libs/flowchart/1.6.5/flowchart.min.js", "options": { "scale": 1, "line-width": 2, "line-length": 50, "text-margin": 10, "font-size": 12 } } - 可能出现一个情况是默认加载的js访问不了或者速度慢,可以下载到本地进行配置。
- 增加属性:
- 查看效果
- 代码
flow st=>start: 开始 op=>operation: My Operation cond=>condition: Yes or No? e=>end st->op->cond cond(yes)->e cond(no)->op - 显示
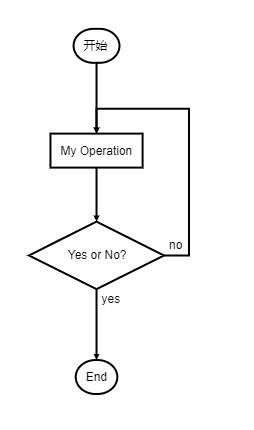
- 代码
配置RSS订阅
- RSS订阅插件:
hexo-generator-feed,地址:https://github.com/hexojs/hexo-generator-feed - 在hexo根目录安装
npm install --save hexo-generator-feed
- 配置hexo配置文件_config.yml
- 增加如下配置:
  feed:
    type: atom
    path: atom.xml
    limit: 20
    hub:
    content:
    content_limit: 140
    content_limit_delim: ' '
    order_by: -date
    icon: icon.png
- 增加如下配置:
- 重启即可。
配置站点地图
- 站点地图插件:
hexo-generator-seo-friendly-sitemap,地址:https://github.com/ludoviclefevre/hexo-generator-seo-friendly-sitemap - 在hexo根目录执行安装
npm install --save hexo-generator-seo-friendly-sitemap
- 在hexo根目录的配置文件中设置
sitemap: path: sitemap.xml - 配置主题配置文件,取消注释:
sitemap: /sitemap.xml || sitemap - 重启即可。
- 点击站点地图查看效果。
内部搜索
- 内部搜索插件:
hexo-generator-search,地址:https://github.com/wzpan/hexo-generator-search - 在hexo根目录安装
npm install --save hexo-generator-search
- 配置hexo配置文件_config.yml
- 增加如下属性
  search:
     path: search.json
     field: post
     content: true
- 增加如下属性
- 属性说明
- path:搜索结果存储的路径,一般为search.xml,也可以配置为search.json.
- field:搜索范围
- content:搜索内容
- 配置主题的配置文件_config.yml,设置属性以启用搜索:
local_search.enable: true - 重启即可。
链接
- 默认地,hexo博客文章的链接是类似:
http://localhost:4000/2019/07/28/HelloWorld这种的,这种方式会有中文出现,如果出现引用的话不太好处理,中文会被encode为很长的内容。所以需要进行连接优化,使得上述内容编译为http://localhost:4000/posts/4a17b156.html的固定链接。 - 链接插件:
hexo-abbrlink,地址:https://github.com/rozbo/hexo-abbrlink - 在hexo根目录安装
npm install --save hexo-abbrlink
- 编辑hexo配置文件_config.yml
# URL ## If your site is put in a subdirectory, set url as 'http://yoursite.com/child' and root as '/child/' url: http://zhangzhiqiang.net root: / #permalink: :year/:month/:day/:title/ permalink: posts/:abbrlink.html abbrlink: alg: crc32 # 算法:crc16(default) and crc32 rep: hex # 进制:dec(default) and hex permalink_defaults: - 属性说明
- permalink: posts/:abbrlink/,默认为:permalink: :year/:month/:day/:title/
- abbrlink.alg: crc32 # 算法:crc16(default) and crc32
- abbrlink.rep: hex # 进制:dec(default) and hex
- 重启即可。
公益404
- 使用腾讯的公益404来表示hexo博客的404页面。
- 地址:
https://www.qq.com/404/ - 需要在页面中插入生成的代码:
 <script type="text/plain" src="http://www.qq.com/404/search_children.js"
           charset="utf-8" homePageUrl="/"
           homePageName="回到我的主页">
- 地址:
- 在hexo根目录新增404页面
hexo new page 404
- 在
hexo/source/404/index.md中增加如下信息--- title: 404 date: 2019-08-03 16:45:56 --- <!DOCTYPE HTML> <html> <head> <meta http-equiv="content-type" content="text/html;charset=utf-8;"/> <meta http-equiv="X-UA-Compatible" content="IE=edge,chrome=1" /> <meta name="robots" content="all" /> <meta name="robots" content="index,follow"/> <link rel="stylesheet" type="text/css" href="https://qzone.qq.com/gy/404/style/404style.css"> </head> <body> <script type="text/plain" src="http://www.qq.com/404/search_children.js" charset="utf-8" homePageUrl="/" homePageName="回到我的主页"> </script> <script src="https://qzone.qq.com/gy/404/data.js" charset="utf-8"></script> <script src="https://qzone.qq.com/gy/404/page.js" charset="utf-8"></script> </body> </html> - 在主题配置文件中取消如下注释:
commonweal: /404/ || heartbeat
- 重启即可。
- 注意:这种方式会让页面自动跳出到另一个页面。
- 配置服务器nginx,支持404页面。
- 在
/etc/nginx下编辑nginx.conf文件 vim nginx.conf- 在
location上增加:error_page 404 /404/index.html;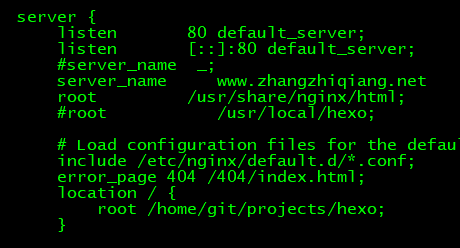
- 在
- 重启nginx即可。
systemctl stop nginx
systemctl start nginx
配置分类、标签页、关于我等
- 在主题配置文件中取消menu下相关属性的注释。
menu: home: / || home about: /about/ || user tags: /tags/ || tags categories: /categories/ || th archives: /archives/ || archive - 在hexo根目录执行指令,需要建立相关页面。
hexo new page categories hexo new page tags - 编辑分类
- 位置:
source/categories/index.md - 编辑内容(主要申明type):
---
title: categories
date: 2019-08-03 23:26:14
type: "categories"
layout: "categories"
---
- 位置:
- 编辑标签
- 位置:
source/tags/index.md - 编辑内容(主要申明type):
---
title: tags
date: 2019-08-03 23:29:56
type: "tags"
layout: "tags"
---
- 位置:
- 编辑关于我
- 位置:
source/about/index.md - 编辑内容(主要申明type):
---
title: about
date: 2019-08-03 23:29:56
type: "about"
---
- 位置:
- 重启即可。
评论系统
- 在hexo博客中添加评论功能,有很多第三方插件,这里选择的是Valine,这款评论系统比较简介,而且有免费的部分可以使用。
- 注册Valine,访问链接进行注册:
https://leancloud.cn/dashboard/applist.html - 注册之后需要实名认证,按步骤操作即可。
- 实名制认证之后,需要创建应用,选择开发版。
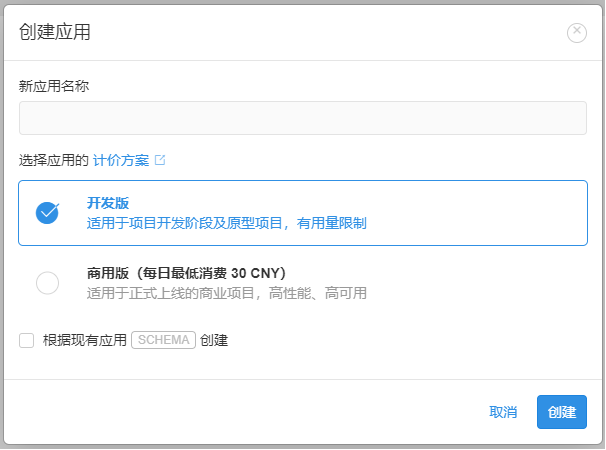
- 配置LeanCloud,把除数据存储其他选项都关闭。
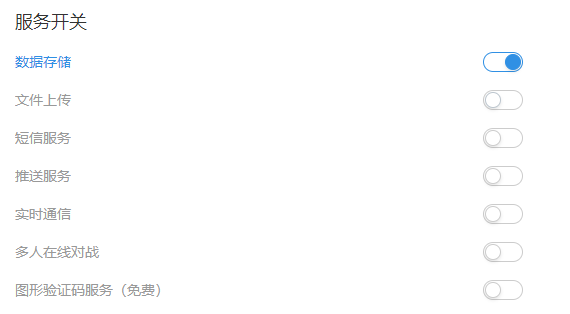
- 配置安全域名

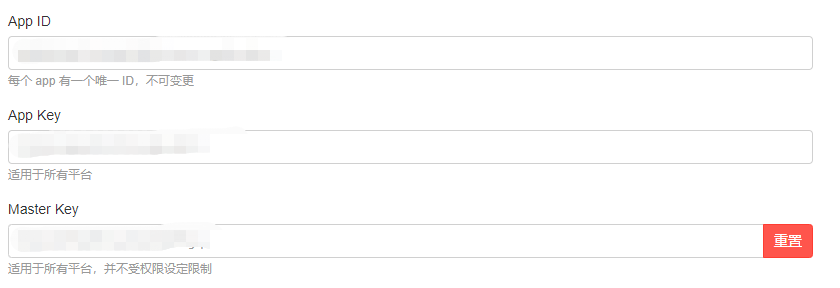
- 获取 APPID 和 APPKEY。
- 评论查看和删除
- 登录Leancloud系统
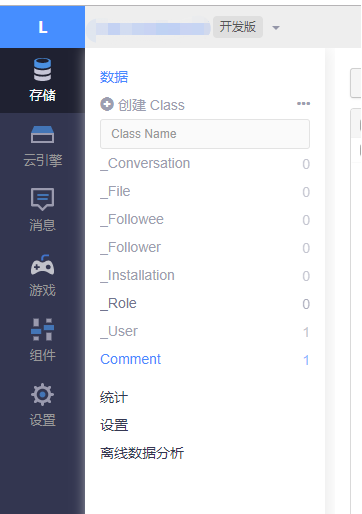
https://leancloud.cn/dashboard/applist.html。 - 访问存储下的comment内容。
- 登录Leancloud系统
- 直接在右侧可以看到评论信息,选择可以删除。

- 获取最新的valine CDN地址。
- 访问
https://www.jsdelivr.com/package/npm/valine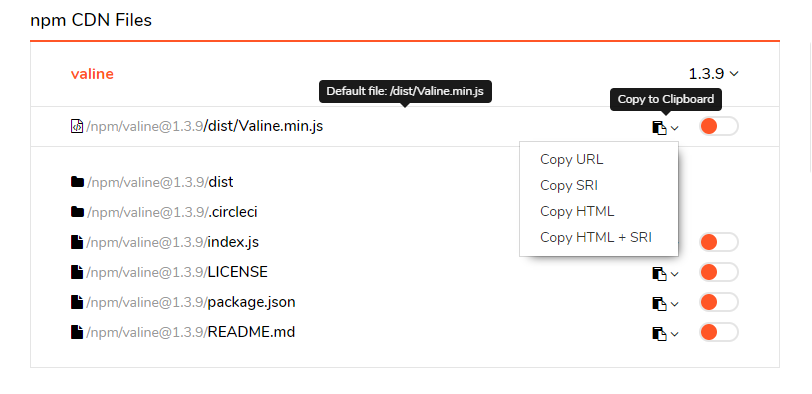
- 选择
https://cdn.jsdelivr.net/npm/valine@1.3.9/dist/Valine.min.js
- 访问
- 配置主题_config.yml文件
- 配置CDN属性:
vendors.valine: https://cdn.jsdelivr.net/npm/valine@1.3.9/dist/Valine.min.js - 配置valine基本属性,主要是:enable、appid、appkey。
valine:
enable: true # When enable is set to be true, leancloud_visitors is recommended to be closed for the re-initialization problem within different leancloud adk version
appid: <Application APPID> # Your leancloud application appid
appkey: <Application AppKey> # Your leancloud application appkey
notify: false # Mail notifier. See: https://github.com/xCss/Valine/wiki
verify: false # Verification code
placeholder: Just Go Go !! # Comment box placeholder
avatar: mm # Gravatar style
guest_info: nick,mail,link # Custom comment header
pageSize: 10 # Pagination size
language: zh-cn # Language, available values: en, zh-cn
visitor: false # leancloud-counter-security is not supported for now. When visitor is set to be true, appid and appkey are recommended to be the same as leancloud_visitors' for counter compatibility. Article reading statistic https://valine.js.org/visitor.html
comment_count: true # If false, comment count will only be displayed in post page, not in home page
- 配置CDN属性:
- 重启即可。

- 指定文章关闭评论功能
a. hexo中的某些博客文章是不需要开启评论的,所以要关闭评论。
b. 在md的front-master中通过comments属性设置来设置,可设置为true或false
c. 如下标签页面不需要评论:title: 标签 date: xxxx type: "tags" comments: false
增加阅读量及热门排行
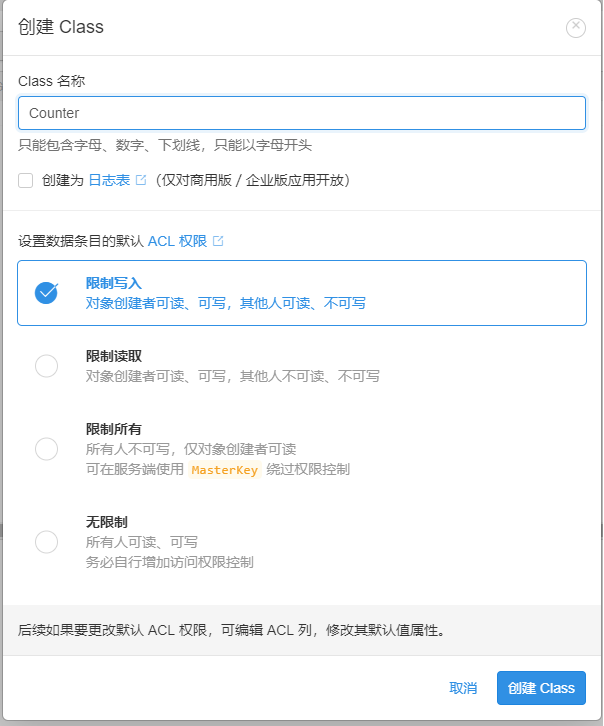
- 类似评论系统,也使用Leancloud,在其中创建一个class,名字必须为“Counter”。
- 配置主题配置文件的leancloud_visitors属性。
# Show number of visitors to each article. # You can visit https://leancloud.cn to get AppID and AppKey. leancloud_visitors: enable: true app_id: # <app_id> app_key: # <app_key> # Dependencies: https://github.com/theme-next/hexo-leancloud-counter-security # If you don't care about security in leancloud counter and just want to use it directly # (without hexo-leancloud-counter-security plugin), set `security` to `false`. security: true betterPerformance: false- i. enable:启用
- ii. app_id:同评论系统相同应用的appid
- iii. app_key:同评论系统相同应用的appkey
- 安装安全补丁。
npm install hexo-leancloud-counter-security --save
- 注册用户
hexo lc-counter r 用户名 密码 如,user1,password - 配置hexo配置文件,增加如下属性
 leancloud_counter_security:
   enable_sync: true
   app_id:
   app_key:
   username: # Will be asked while deploying if is left blank
   password: # Recommmended to be left blank. Will be asked while deploying if is left blank
- i. app_id为申请好的appid
- ii. app_key为申请好的appkey
- iii. username为刚才注册的用户
- iv. password为刚才注册用户的密码
- 配置热度页面
- 增加页面
hexo new page hot
- 编辑 index.md如下内容,
<div id="hot"></div>
<script src="https://cdn1.lncld.net/static/js/av-core-mini-0.6.4.js"></script>
<script>AV.initialize("leancloud_appid", "leancloud_appkey");</script>
<script type="text/javascript">
var time=0
var title=""
var url=""
var query = new AV.Query('Counter');
query.notEqualTo('id',0);
query.descending('time');
query.limit(1000);
query.find().then(function (todo) {
for (var i=0;i<1000;i++){
var result=todo[i].attributes;
time=result.time;
title=result.title;
url=result.url;
var content="<p>"+"<font color='#1C1C1C'>"+"【文章热度:"+time+"℃】"+"</font>"+"<a href='"+"https://wangc1993.github.io/"+url+"'>"+title+"</a>"+"</p>";
document.getElementById("hot").innerHTML+=content
}
}, function (error) {
console.log("error");
});
</script>
- 增加页面
- 注意i. 其中域名地址修改为自己的
- 注意ii. 其中appid、appkey修改为自己的
- 配置hexo配置文件,增加部署策略leancloud_counter_security_sync
deploy: - type: git repo: git@xxx:/home/git/repos/hexo.git branch: master # other deployer - type: leancloud_counter_security_sync - 配置主题
- 配置menu属性,增加
hot: /hot/ || signal - 配置国际化语言,编辑
hexo/themes/next/languages/zh-CN.yml,在menu下增加:hot: 热度
- 配置menu属性,增加
- 重启即可。
百度统计
- 登录百度统计
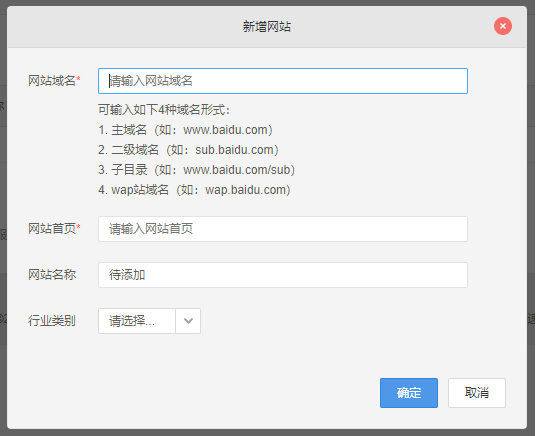
http://tongji.baidu.com/ - 新增网站,定位到站点
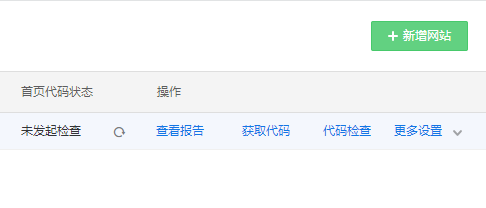
- 创建完成后,点击“获取代码”
- 查看代码,获取百度统计的ID
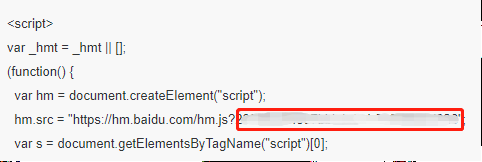
- 编辑主题配置文件_config.yml,配置百度统计的ID
baidu_analytics: APPID - 编辑主题配置文件_config.yml,配置不蒜子
busuanzi_count: enable: true total_visitors: true total_visitors_icon: user total_views: true total_views_icon: eye post_views: true post_views_icon: eye - 属性说明
- enable: false,设true 开启
- total_visitors: true,总阅读人数 uv数
- total_visitors_icon: user,阅读总人数的图标
- total_views: true,总阅读次数 pv数
- total_views_icon: eye,阅读总次数的图标
- post_views: true,开启内容阅读次数
- post_views_icon: eye,内容页阅读数的图标

Fork me on github
- 在博客右上角添加fork me on github,如下的链接可查看样式
- 配置主题配置文件_config.yml,启用 github_banner
github_banner: enable: true permalink: Github地址 title: Follow me on GitHub - 重启后即可看到效果,但样式是固定的。

- 修改Github样式
- 从上述清单中找到自己喜欢的样式,拷贝,修改其中的github地址。
- 将修改后的内容拷贝至主题文件 hexo\themes\next\layout_layout.swig 中的
- 重启即可。
- 注意这时最好关闭主题默认的github配置,否则会同时出现两种图标。

- 注意这时最好关闭主题默认的github配置,否则会同时出现两种图标。
增加打赏
- 开启博客的打赏功能。
- 准备微信、支付宝的二维码
- 配置主题配置文件
reward: wechatpay: /images/wechatpay.png alipay: /images/alipay.png - 重启即可。
配置live2d模型
- Hexo可以使用live2d模型,插件:hexo-helper-live2d,地址:
https://github.com/EYHN/hexo-helper-live2d - 在hexo根目录安装
npm install --save hexo-helper-live2d
- 在hexo根目录安装模型包
npm install --save live2d-widget-model-wanko- live2d模型可从GitHub找到复核自己要求的模型。
- 配置hexo的文件_config.yml
- 增加配置属性
#Live2D动画 live2d: enable: true scriptFrom: local pluginRootPath: live2dw/ pluginJsPath: lib/ pluginModelPath: assets/ tagMode: false debug: false model: use: live2d-widget-model-wanko display: position: left width: 300 height: 300 mobile: show: true - 其中:
- i. enable:是否启用
- ii. position:显示位置
- iii. width、height:宽高
- iv. model为当前已安装的模型名称
- v. mobile.show:移动端是否显示
- 增加配置属性
- 重启即可。
- 效果:

